Village halls can be challenging for sound quality due to hard surfaces, high ceilings, and uneven sound distribution. These factors create echo, feedback, and muddled audio. But with the right setup, you can achieve clear, balanced sound for any event.
Here’s how to improve sound in village halls:
- Understand the space: Hard floors and reflective walls amplify echoes, while high ceilings increase reverberation.
- Choose the right equipment: Portable PA systems with built-in mixers and Bluetooth functionality are ideal. Column array speakers work well for even sound distribution.
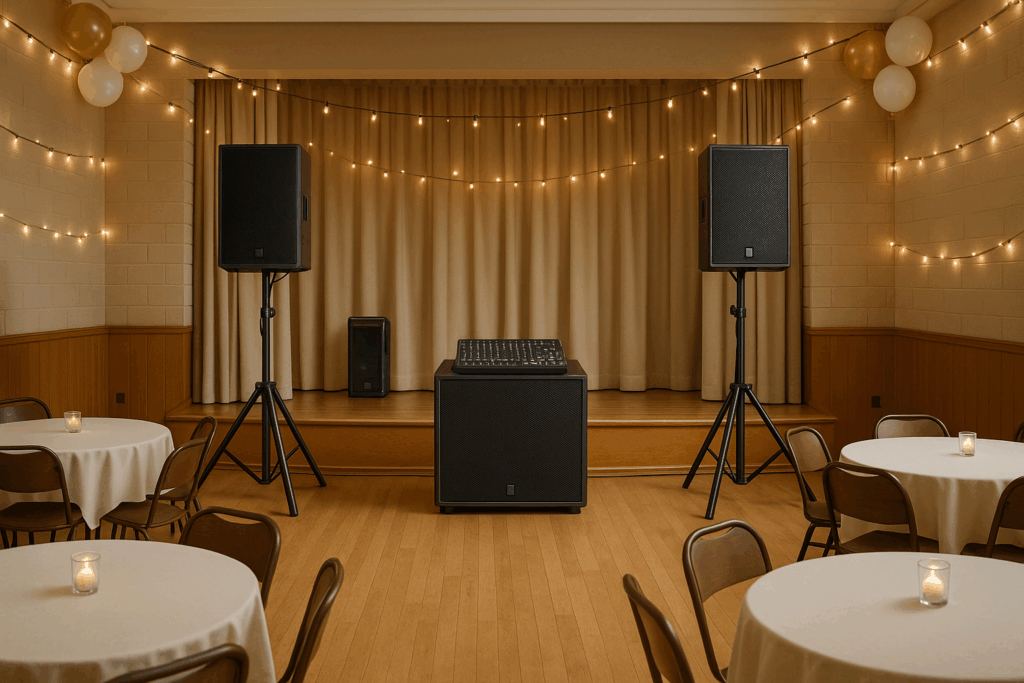
- Position speakers carefully: Place speakers at ear level, angled toward the audience. Use stands to elevate them and avoid feedback by keeping microphones behind speakers.
- Improve room acoustics: Use rugs, curtains, and acoustic panels to reduce echoes. Ceiling baffles help in spaces with high ceilings.
- Fine-tune sound: Adjust EQ settings to cut muddy frequencies and boost clarity. Use high-pass filters to clean up sub-bass.
How Sound Works in Small Venues
Grasping how sound behaves in small venues like village halls is key to managing audio effectively. These spaces come with their own set of acoustic challenges, but understanding them can help you make the most of the environment.
In village halls, hard surfaces such as wooden floors, plaster walls, and metal fixtures tend to reflect sound waves instead of absorbing them. This reflection causes sound to bounce around the room multiple times before fading out, creating a complex acoustic environment.
The size and shape of the venue also have a big impact. Smaller spaces often produce rapid reflections, leading to a “boxy” or unnatural sound. When sound waves repeatedly bounce between parallel walls, they can interfere with the direct sound coming from your speakers. This interference makes music sound muddy and speech harder to understand. Recognizing these dynamics is essential for optimizing sound in these settings.
Let’s dive into some of the most common sound issues you might experience in village halls.
Common Sound Problems in Village Halls
Village halls often have specific acoustic challenges. High ceilings are a major culprit, as they create difficult conditions for managing sound. Acoustic expert Chris Pollock from Arup explains, “The ceiling is actually ground zero for controlling sound in a space”. When sound waves hit a high ceiling and reflect back down, they result in longer reverberation times, making it harder to clearly hear speech or music.
These halls are typically designed to be functional and adaptable, not acoustically optimized. As a result, reflective walls and large open spaces are common. These surfaces can create a “ping-pong” effect, where sound bounces back and forth, leading to an unnatural and chaotic listening experience.
Other frequent problems include uneven sound distribution, where some areas are too loud while others are too quiet, and feedback issues, which happen when microphones pick up reflected sound from speakers. Addressing these challenges begins with understanding a few basic acoustic terms.
Basic Sound Terms You Should Know
Reverberation refers to the lingering sound that remains after the original source has stopped. It happens when sound waves bounce off multiple surfaces before gradually fading.
“Reverberation is the persistence of sound in a space after the sound source has stopped. It is caused by the reflection of sound waves off surfaces in the space.”
For village halls, the ideal reverberation time is between 1.5 and 2.5 seconds. Longer reverberation times can make speech hard to understand and music sound unclear.
Sound reflection is when sound waves bounce off surfaces and interfere with the direct sound coming from speakers. Acoustic engineer Dennis Foley explains:
“Reflections are energy that strikes the room surface and comes back, causing interference with the direct energy from the speakers.”
Sound absorption happens when sound energy is converted into heat through friction, reducing the amount of reflected sound in the room. Foley further elaborates:
“Absorption is an energy process that changes from one form to another through friction and heat. It is an effective way to reduce the amount of reflected sound in a room.”
Signal-to-noise ratio measures how much louder your audio is compared to background noise. For clear sound, aim for a difference of at least 15 dB between your music and the ambient noise.
Choosing Sound Equipment for Village Hall Parties
When it comes to hosting events in village halls, picking the right sound equipment is a game-changer. These spaces often pose unique acoustic challenges, so your setup needs to strike a balance between power, clarity, and practicality. Whether it’s soft background music during dinner or upbeat tracks for dancing, your sound system must adapt seamlessly. A combination of versatile PA systems and DJ equipment can help you meet these demands.
Portable PA Systems and Speakers
Portable PA systems are a go-to solution because they pack multiple features – like amplifiers, mixers, and inputs – into a single, easy-to-move unit. They’re efficient, straightforward to set up, and perfect for events where time and convenience are priorities.
Power output is a key factor to consider, though its importance often gets misunderstood. For instance, a solo acoustic performance in a smaller setting might only need around 60 watts. On the other hand, livelier events with a crowd will require systems with higher wattage. Built-in mixers are another feature to look for, as they allow you to fine-tune audio based on the hall’s acoustics. Systems with multiple input options – like microphones, instruments, Bluetooth, and USB – give you the flexibility to adapt to different needs.
Bluetooth functionality is especially handy, offering wireless control and music streaming, so you’re free to move around the room while managing the sound. Column array line speakers are another great option, particularly for rectangular spaces like village halls. These slim, vertical units distribute sound more evenly compared to traditional box speakers.
Lastly, choose a system with extra input channels. Village hall events often evolve, and having the capacity to add more microphones or instruments can be a lifesaver.
DJ Equipment for Small Setups
While PA systems cover general sound needs, DJ equipment adds a personal touch to your village hall parties.
DJ controllers are a practical choice, especially for beginners. They’re budget-friendly, compact, and easy to set up – perfect for smaller spaces where simplicity is key. USB-powered controllers are particularly convenient, as they eliminate the need for extra power sources, reducing cable clutter and streamlining your setup. For those just starting out, high-quality used DJ controllers can deliver excellent results without breaking the bank.
If you’re looking to step up your game, all-in-one DJ systems are a solid option. These units don’t require a laptop, making them ideal for intermediate or professional users. However, they tend to be larger and may not be the best fit for tight spaces.
Don’t overlook microphone integration. Village hall events often include speeches, announcements, or interactive segments, so having dedicated microphone inputs with independent volume and EQ controls is a must. This ensures clear speech without constantly adjusting the music.
For more advanced setups, an audio interface might come in handy. A simple 2–4 channel interface is usually enough for connecting multiple audio sources and improving sound quality. Just make sure it’s compatible with your DJ controller and has the inputs you’ll need.
Finally, invest in practical accessories like dust covers. These protect your equipment from dirt and debris, which can be an issue in village halls, and they’re invaluable for safe transport and storage between events.
The aim is to create a setup that’s easy to manage, fits the space, and delivers high-quality sound for any occasion.
Speaker Placement and Layout Tips
Getting your speakers positioned correctly can make or break your village hall party. Poor placement can leave some areas too quiet while others are overwhelmingly loud. The goal is to create balanced sound coverage throughout the space and avoid the dreaded feedback squeal that can disrupt the event.
Where to Place Your Speakers
The key to effective speaker placement is ensuring every guest has a clear line of sight to at least one speaker. This helps sound travel directly to your audience instead of bouncing off walls or ceilings, which can distort audio quality.
Start by placing the main speakers on either side of the primary activity area, whether that’s a dance floor, stage, or presentation space. Angle them inward at about 22–30 degrees toward the center of the audience. This creates an overlap in sound, providing the best audio experience for the majority of your guests.
Use speaker stands to elevate the speakers above obstacles like tables, chairs, or groups of people. This prevents muffled sound and allows the audio to reach everyone clearly. For example, Kanto S2 stands, which cost around $25, are a budget-friendly option.
When it comes to subwoofers, avoid placing them in corners. While corners can amplify bass, they often make the low-end sound muddy. Instead, position the subwoofer near a wall but away from corners to get a cleaner, more defined bass sound.
If your venue is particularly large or oddly shaped, consider using delay speakers. These additional speakers are placed further into the space and electronically delayed to ensure the sound stays in sync with the main speakers, providing seamless coverage throughout the room.
Avoid overcrowding small spaces with too many speakers. More speakers don’t necessarily mean better sound – they can create interference instead. Plan your layout carefully by mapping out seating and activity areas before deciding on speaker placement.
To prevent feedback, proper positioning is crucial. As Carvin Audio advises:
“The best practice is to always position your speakers in front of your microphones…by simply positioning your microphones behind the speakers you can eliminate most feedback issues.”
If low ceilings are an issue, lowering your speaker height slightly can help reduce reflections and feedback while improving clarity. Similarly, Shure USA recommends:
“Try to keep microphones and loudspeakers as far away from each other as possible.”
Once your speakers are set up to provide even sound coverage, it’s time to focus on organizing your DJ booth and managing cables to create a polished and functional setup.
Setting Up Your DJ Booth and Managing Cables
After perfecting your speaker layout, turn your attention to the DJ booth. This is your command center, so it needs to be well-organized, accessible, and safe for both you and your guests. Place your mixer in the center with playback devices on either side, ensuring all essential controls are within easy reach. This setup allows you to manage the music flow effortlessly.
Start by identifying power outlets and planning your booth layout around them. Avoid running cables across high-traffic areas to prevent tripping hazards. If outlets are limited, a quality power strip with surge protection is a must. The Orico power strip, priced at around $28, is a great option and even includes USB ports for charging devices.
Proper cable management is essential for safety and a professional appearance. Velcro cable ties, which cost about £10 for a pack of 100, are a simple solution for bundling cables together neatly. To make troubleshooting easier, color-code your cables by function – use red for power, blue for audio, and green for data.
For a polished look, use a J-Channel Cable Raceway (approximately £15) to organise and secure cables under your workstation. Alternatively, the UTWire In-Box (around £26) can hide your power strip and reduce floor clutter.
Speaker stands can also help with cable management by keeping connections off the floor. Additionally, a laptop stand like the Pyle-Pro model (about £18) can free up desk space and reduce strain while you work.
Keep spare cables, adapters, and tools in a nearby case for quick access. A clean and organized DJ booth not only looks professional but also ensures you’re ready to keep the party running smoothly.
Simple Ways to Improve Room Sound
Once you’ve chosen the right equipment and set up your speakers properly, there are a few straightforward ways to enhance the sound quality in a room. Village halls, for example, often have acoustics that make parties and events challenging. Hard surfaces in these spaces can create echoes that muddle both speech and music. Fortunately, you can address these issues without investing in expensive renovations.
Quick Soundproofing Methods
To cut down on echo, incorporate sound-absorbing materials. Acoustic wall panels are particularly effective for large, reflective surfaces. A good rule of thumb is to cover about 25%–30% of the wall and ceiling area to achieve noticeable results.
Take the experience of the 1st Gresley Scout Group, for instance. They dealt with severe echo issues that made communication nearly impossible. Mr. Barnes, the Group Scout Leader, shared their story:
“We installed them due to having a real ‘bounce issue’ around the hall. Kids couldn’t hear leaders and leaders really struggled to hear the kids… Since we installed the sound absorption wall panels, we have had numerous comments about how people can now finally hear each other. One child who wears cochlear implants normally just took them off as soon as they arrived, as they couldn’t hear a thing. They now can!”
For temporary fixes, consider using acoustic blankets, quilts, or heavy drapes. These can absorb sound effectively without causing any permanent changes to the venue. Just make sure to eliminate gaps for the best results.
Soft furnishings can also work wonders for acoustics. Carpets, rugs, and upholstered chairs naturally absorb sound, reducing harsh echoes. If the hall has hard floors, placing area rugs in key spots like seating or dancing areas can make a noticeable difference.
In spaces with high ceilings, acoustic ceiling rafts and baffles can help absorb sound from above, tackling echo problems at their source. These can be installed as a semi-permanent solution or used temporarily during events, depending on the venue’s policies.
Once you’ve addressed the room’s acoustics, it’s time to fine-tune your sound system for even better clarity.
Adjusting EQ and Filters for Clear Sound
After improving the room’s acoustics, focus on refining your sound system’s EQ settings. Start with a flat EQ and make adjustments as needed. Ideally, a high-quality system requires minimal EQ tweaking.
High-pass filters are a great starting point for cleaning up your mix. Setting a high-pass filter around 30–40 Hz removes unnecessary sub-bass that can make the sound feel boomy. Applying these filters to channels that don’t need very low frequencies can also free up headroom and improve overall clarity.
Once the sub-bass is under control, shift your attention to vocal clarity and instrument balance. For vocals, which are often the centerpiece of a mix, focus on specific frequency ranges. If they sound muddy, try cutting low frequencies between 200–500 Hz. If they seem too nasal, reduce frequencies in the 1–3 kHz range. Be cautious when boosting around 4 kHz, as too much can make vocals harsh.
To tackle general muddiness, consider lowering frequencies in the 250–500 Hz range. A slight boost in the 1–2 kHz range can enhance clarity, while increasing levels around 3–6 kHz improves definition and articulation. Adding a gentle boost between 10–12 kHz can brighten the mix, but if sibilance becomes an issue, carefully cut between 5–8 kHz.
Keep in mind, EQ adjustments are meant to complement the room’s sound treatment, not fix fundamental issues. Always aim to cut problem frequencies before boosting others, and make sure each instrument has its own space in the mix.
Comparison Table: Sound Treatment Options
| Treatment Type | Best For |
|---|---|
| Acoustic Wall Panels | Large reflective walls and long-term fixes |
| Sound Blankets/Quilts | Temporary events and rental venues |
| Heavy Curtains | Windows, doorways, and bare walls |
| Area Rugs | Hard floors and seating areas |
| Ceiling Baffles | High ceilings and overhead echo problems |
| Portable Room Dividers | Zoning and noise control |
Combining several treatments often delivers the best results. Start with simple fixes like rugs and curtains for immediate improvements, then add specific acoustic solutions like wall panels or ceiling baffles to target problem areas. These adjustments, paired with proper sound system settings, ensure a clear and balanced sound throughout the venue.
Sound System Setup and Testing Guide
Getting your sound system connected and tested properly is key to pulling off a successful village hall party. A well-organized setup and testing process ensures everything works seamlessly when your guests arrive.
Connecting and Adjusting Your System
Start by evaluating the venue’s acoustics and power requirements. Walk around the hall to observe how sound behaves naturally in the space. Make sure the audio system is on a separate power circuit from lights, food service equipment, or refrigeration units to avoid electrical interference.
Once you’ve planned your speaker placement, double-check that all components are functioning as expected. Think about how much coverage you need and position speakers to maintain a clear line of sight to the audience for better sound clarity.
Choose microphones based on what the event demands – whether it’s speeches, singing, or live instruments. Decide between wired and wireless options, and if the venue has good airflow, add windscreens to microphones to cut down on wind noise.
Connect your mixer and any processors like equalizers, compressors, or feedback suppressors. These tools are essential for fine-tuning audio quality. Make sure presenters or performers know how to use the microphones properly before the event kicks off.
Once all connections are secure, take time to test and fine-tune the system.
Fixing Common Sound Problems
With everything connected, test for common issues like feedback and connectivity problems. Feedback often happens when microphones pick up sound from speakers. To prevent this, ensure all microphones are working correctly, increase the distance between microphones and speakers, and check for nearby reflective surfaces. Use close miking techniques to capture a strong, clear signal. If feedback occurs, try muting or lowering the affected channel or tweak the equalizer to resolve the issue.
Connectivity hiccups can also disrupt your setup. Check that all cables and components are securely connected. If you hear a ground hum, inspect any DI boxes and use the ground lift switch to eliminate it. Test each microphone and audio source individually with test tones or music to pinpoint any distortion or unwanted noise.
Inconsistent volume levels or poor sound quality might stem from the room’s acoustics. Walk through the venue and listen from different audience spots to ensure sound is consistent and clear. Adjust speaker placement or angles as needed. For system tuning, play pink noise or familiar reference tracks and use an analyzer with the mixer’s EQ to balance the overall tone for better clarity.
Create a detailed testing checklist to confirm everything is working as it should. Test each microphone for clarity, ensure speakers distribute sound evenly, and gradually raise microphone levels to identify any feedback-prone frequencies. Use the EQ to reduce gain at those problem frequencies.
Set aside enough time before the event for thorough setup and testing. Train staff to manage levels and troubleshoot common issues during the party. By ironing out potential problems in advance, you can deliver crisp, balanced audio for your guests.
Also, be aware of potential dead zones or interference that can lead to uneven sound. Adjust speaker positioning, add fill speakers if needed, or relocate equipment causing interference. The ultimate goal is a consistent, clear sound experience that elevates your village hall party.
Conclusion: Getting Great Sound in Village Halls
Achieving great sound in a village hall comes down to smart planning, the right equipment, and thoughtful adjustments to the space. With these basics in place, even smaller venues can deliver professional-quality audio that keeps guests entertained and fully engaged.
Start with the essentials: clarity over volume. Invest in powered speakers, a digital mixer, and dynamic microphones. Powered speakers simplify setup by removing the need for separate amplifiers, while an 8–12 channel digital mixer gives you control, built-in effects, and the ability to save settings for future use. Dynamic microphones are perfect for smaller spaces because they reduce background noise and handle loud sound levels effectively.
Next, focus on strategic placement and room adjustments. Position speakers at ear level and angle them toward the audience for clear, direct sound. Avoid placing them near walls or corners to minimize sound reflections. Set up your DJ booth where you can see the crowd and your equipment clearly, keeping cables neatly managed to prevent hazards.
To fine-tune the room, simple tricks like hanging fabric or rearranging furniture can help reduce harsh sound reflections. Use your mixer’s EQ to cut muddy frequencies and enhance those that improve speech clarity. These small tweaks can make a big difference in the overall audio experience.
Finally, don’t skip the testing phase. Walk around the venue and listen from various spots to ensure consistent sound coverage. Use pink noise or reference tracks to fine-tune your system and make adjustments as needed. Every step – from choosing the right gear to optimizing the room – works together to create a seamless audio experience.
FAQs
×
What’s the best way to prevent feedback when using a sound system in a village hall?
To avoid feedback, position microphones far from speakers and direct them away from each other. Directional microphones are especially useful since they hone in on the intended sound source while minimizing background noise. You can also tweak the EQ settings to reduce frequencies that commonly cause feedback and keep speaker volume at a reasonable, balanced level.
Speaker and microphone placement matters too. Avoid pointing speakers at reflective surfaces like walls or ceilings, as this can amplify unwanted sound. Also, make sure the gain levels are properly set – over-amplification is a common culprit behind feedback. With these straightforward adjustments, you can achieve clear and uninterrupted audio.×
What sound equipment works best for events in small venues like village halls?
For smaller venues like village halls, portable PA systems with powered speakers are a fantastic option. Models such as the Yamaha DXR 15 or the RCF HD series are known for delivering clear and well-balanced sound, making them suitable for a variety of events. Pairing these systems with a dependable mixer and quality microphones ensures even better audio performance.
For speeches or presentations, a mono or stereo system with broad coverage is usually sufficient. If you’re hosting a larger event, adding extra speakers or subwoofers can provide deeper bass and fuller sound. On the other hand, smaller gatherings benefit from compact systems that are simple to set up and operate. To get the best sound quality, pay attention to speaker placement and make basic acoustic tweaks to reduce echoes and enhance clarity.×
What are some easy ways to improve sound quality in a village hall without making permanent changes?
If you’re looking to improve sound quality in a village hall without making any permanent changes, there are a few practical options to consider. Portable acoustic panels, bass traps, and diffusers are excellent choices. They can be set up quickly and taken down just as easily, making them perfect for temporary use.
Another effective approach is to hang sound-absorbing curtains or even thick blankets along walls and over windows. This helps cut down on echoes and enhances sound clarity in the room.
For a fast and lightweight solution, try foam tiles or fabric-covered panels. Placing these strategically around the space can significantly reduce reverberation. These methods are simple to implement, effective, and won’t leave any permanent marks on the hall.